
Yo Developer!!
In my previous article I gave an overview of Android Instant Apps. It’s important you understand the entire process of Instant apps and the issues it’s capable of solving both for developers and users. Before I proceed, take a peek at my article on making your first instant app. If you have done so, let’s kickstart right away…
Google Play Instant allows native Android apps to run without requiring installation. As of now, not all apps support Google Play Instant, however, apps that support can run in a variety of situations, such as when a user clicks a link in an sms or uses the “Try Now” button from the Google Play Store
In this article, we’ll leverage Google Play Instant’s capability to load code on-demand via feature modules. We’ll start with the “SimpleLogin” app I wrote in kotlin which supports Google Play Instant. We’ll then take the app and modularize its code to create a multi feature app that also supports Google Play Instant. The entire source code for this article will be available at the end of this article.
Prerequisites
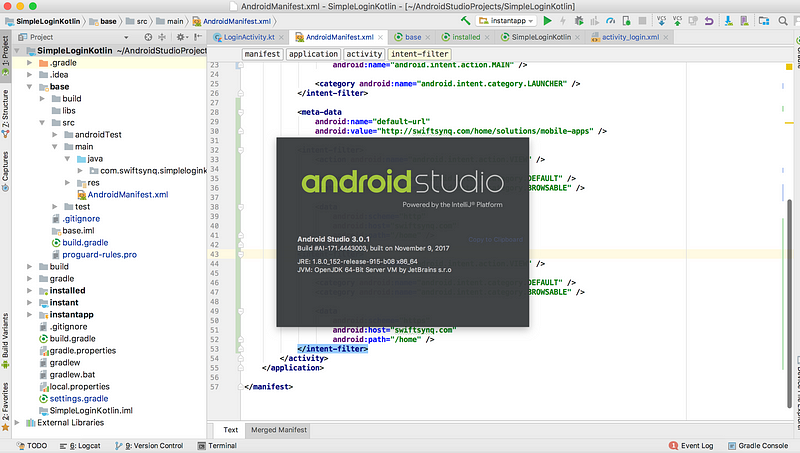
- Update your Android Studio: Ensure you are using Android Studio 3.0. If you are using an older version of Android Studio, download version 3.0 or later. Take a look at my own Android studio current version
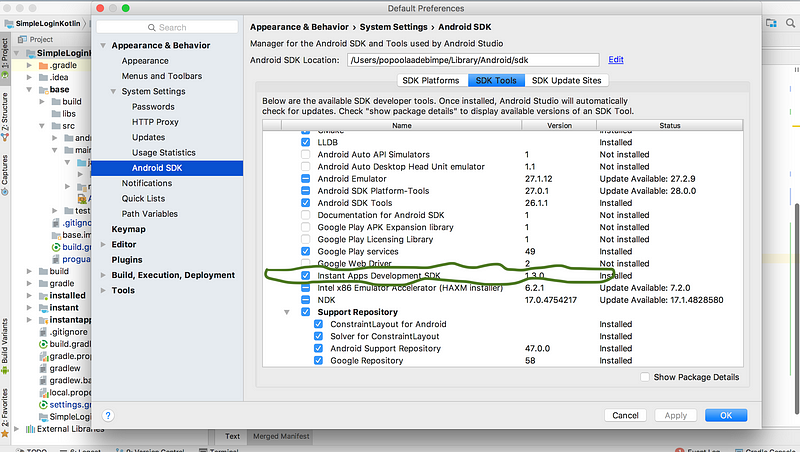
- Install Instant App Sdk from SDK Manager: To build an app that support Google Play Instant, Instant App SDK has to be installed. To do that, go to Tools -> SDK Manager. Click on the “SDK Tools” tab and install “Instant Apps Development SDK” by checking the box and hitting “Apply”
- Install Android API 27 SDK and Tools: Go to Tools -> SDK Manager. Click on the “SDK Platforms” tab. Make sure the Show Package Details checkbox is pressed. Be sure to install the Android 8.1 system images and tools are installed by checking the following boxes under “SDK Platforms” tab and hitting “Apply” button:
- “Android 8.1 (Oreo)” or “Android API 27”
2. “Google APIs Intel x86 Atom System Image”
3. “Google Play Intel x86 Atom System Image”

Quick Intro to Google Play Instant
Building your first instant app can be exciting, however, you need to be aware that when supporting Google Play Instant on your app you can and absolutely should use the same codebase for your instant app and your installable app. SimpleLogin App I wrote for the purpose of this article is all inside a single app module, which is built using the com.android.application gradle plugin:

By the end of this article, you have three modules, built with two new plugins. They are the com.android.instantapp and com.android.feature:

This might seem ambiguous to you, you don’t have to bother.Let’s look at each component one after the other.
- com.android.instantapp — This is the module that builds your instant app. It doesn’t contain any of your app code. All it does is consume feature modules.
- com.android.feature — Modules where the actual code for the entire app resides.
- com.android.application — This module builds your installable app. It doesn’t need to contain app code. In addition, it consumes feature modules.
From the figure above, we can say that two apps(instant and installable app) are sharing a single codebase which is the feature modules.
Move existing code into a feature module
SimpleLogin app was not initially designed to support Google Play Instant, so to make our app Instant compliant, we need to move the existing code into a feature module.
In this step, we will convert the existing application(app) module which builds itself into a separate application module which builds a feature module.
Creating a feature module will require changing the plugin type of app from com.android.application to com.android.feature. We’ll also rename the module from app to base (for reasons that we’ll explain later).
Then you’ll create a installed app module with the name installed that will use the application plugin. This module will build the APK.
To start, we will switch the app module type from application to feature
- Rename ‘app’ to ‘base’

2. Make :base a Feature module
Let’s change the module type to Feature module by changing the plugin type from com.android.application to com.android.feature in the base/build.gradle file:
//add this
apply plugin: 'com.android.feature'
//Remove this
apply plugin: 'com.android.application'
3. SetbaseFeature to true flag
Every app that supports Google Play Instant must have one feature module marked as the base feature module. You’ll learn more about what this means later. For now, since we only have one feature module, we’ll make it the base feature module by setting the baseFeature flag to true:
base/build.gradle
android {
    ...
    baseFeature true
    ...
}
4. Create the installed module
Beautiful!!!! We are almost done with the new base feature module which contains all of the app code.
Now you’ll create a minimal application module, responsible for building the APK.
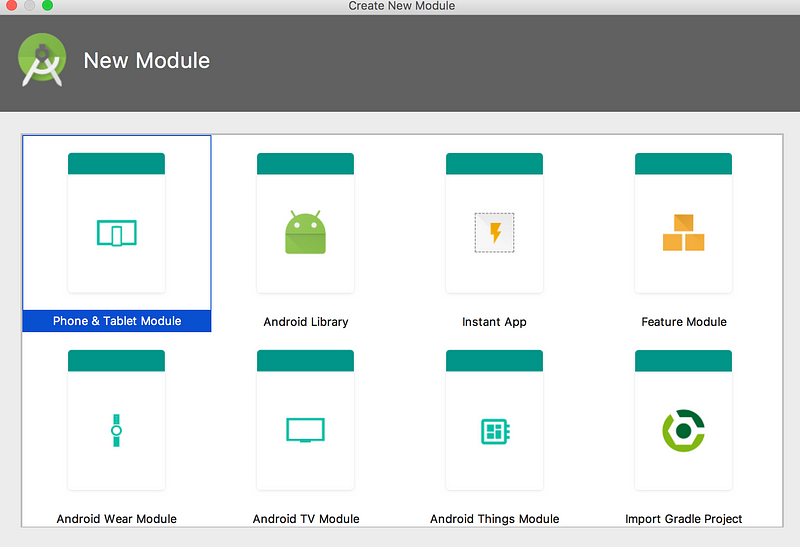
From File->New Module…
Select “Phone & Tablet Module”, click “Next”
Set the following:
- Application name — “SimpleLogin Installed”
- Module name — “installed”
- Package name —
com.swiftsynq.simpleloginkotlin.installed - Minimum SDK — API 21. This is the minimum version defined in the original code and the main APK should still work for that API level.
Click “Next”.

Select “Add No Activity” and click “Finish”

5. Move applicationId from :base to :installed
base/build.gradle
android { ... defaultConfig { // remove this lineapplicationId "com.swiftsynq.simpleloginkotlin"... } ... }
installed/build.gradle
android { ... defaultConfig { // replace // applicationId "com.swiftsynq.simpleloginkotlin.installed" // withapplicationId "com.swiftsynq.simpleloginkotlin"... } ... }
Sync the gradle files and re-build the project with Build->Rebuild Project. It should build without issue.
6. Associate :installed and :base
At this point, we need to have :installed build :base. To achieve this, replace all the compile dependencies in installed/build.gradle with this single dependency:
installed/build.gradle
dependencies {
    implementation project(':base')
}
7. Reduce installed AndroidManifest
You need the application element frominstalled/src/main/AndroidManifest.xml. It should only contain this single manifest element with the package com.swiftsynq.simpleloginkotlin
installed/src/main/AndroidManifest.xml
<manifest xmlns:android="http://schemas.android.com/apk/res/android"
          package="com.swiftsynq.simpleloginkotlin">
</manifest>
8. Update the package in :base Android Manifest
In Android, multiple manifests are not permitted to have the same package name. Hence, we will change the package name in the base AndroidManifest to com.swiftsynq.simpleloginkotlin.base .
<manifest xmlns:android="http://schemas.android.com/apk/res/android"
          xmlns:tools="http://schemas.android.com/tools"
          package="com.swiftsynq.simpleloginkotlin.base">
...
</manifest>
9. Fully qualify Activity class name
Because we have changed the package, our base androidmanifest should look like this
<?xml version="1.0" encoding="utf-8"?>
<manifest xmlns:android="http://schemas.android.com/apk/res/android"
    package="com.swiftsynq.simpleloginkotlin.base">
    <!-- To auto-complete the email text field in the login form with the user's emails -->
    <uses-permission android:name="android.permission.GET_ACCOUNTS" />
    <uses-permission android:name="android.permission.READ_PROFILE" />
    <uses-permission android:name="android.permission.INTERNET" />
    <uses-permission android:name="android.permission.READ_CONTACTS" />

    <application
        android:allowBackup="true"
        android:icon="@mipmap/ic_launcher"
        android:label="@string/app_name"
        android:roundIcon="@mipmap/ic_launcher_round"
        android:supportsRtl="true"
        android:theme="@style/AppTheme">
        <activity
            android:name="com.swiftsynq.simpleloginkotlin.base.LoginActivity"
            android:label="@string/app_name">
            <intent-filter>
                <action
                    android:order="1"
                    android:name="android.intent.action.MAIN" />

                <category android:name="android.intent.category.LAUNCHER" />
            </intent-filter>

            <intent-filter>
                <action android:name="android.intent.action.VIEW" />

                <category android:name="android.intent.category.DEFAULT" />
                <category android:name="android.intent.category.BROWSABLE" />

            </intent-filter>
            <intent-filter>
                <action android:name="android.intent.action.VIEW" />

                <category android:name="android.intent.category.DEFAULT" />
                <category android:name="android.intent.category.BROWSABLE" />

            </intent-filter>
        </activity>
    </application>

</manifest>
10. Run installed module and make sure it builds
Finally Finally sync Gradle files and build this project using Build->Build APKS
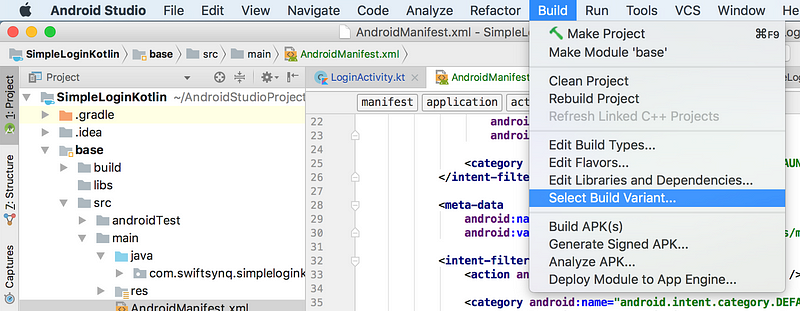
Yessssssssssss!!!
Congratulations! We have just moved the app’s core functionality into a shareable feature module and we are now set to add the instant app module.
Creating the instant app build process
So at the moment, we have a feature module called :base which contains the entire code. The :installed module builds the :base module as an APK (an installable app). In this step we will create the :instant module which will build the :base module as an instant app.

- Create an instant app module
Select File -> New -> New Module and enter library name(call it instant)…

2. Associate :instant and :base
Next, we need to update the instant app gradle file to depend on the :base feature module.
instant/build.gradle
dependencies {
    implementation project(':base')
}
Now do a clean rebuild: Build -> Rebuild project.
3. Add your first App Link with App Links Assistant
When users are using Google Play Instant they don’t install your app , so to launch your app, users will often click on a link. For Google Play Instant, URLs are the entry point into an app and they are associated with Activities. These URLs must be verified App Links.
An App Link is a url which you have proven that you own and that you associate with your Android App. They are not Google Play Instant specific, but Google Play Instant uses them to make their url entry points work.
You’ll create an App Link mapping http://swiftsynq.com/login to the LoginActivity. You can however choose to use your own URL for the purpose of this article.
To create App Links, you’ll use a feature built into Android Studio called “App Links Assistant.” Open this tool by going to Tools -> Apps Links Assistant :

Create a new URL mapping with the following details:
Host: http://swiftsynq.com
Select “pathPrefix” from dropdown
Path: /login
Activity: com.swiftsynq.simpleloginkotlin.base.SigninActivity (base)

4. Include https variant
You also want https://swiftsynq.com/login to map to the SigninActivity.
From the editor, tap the “+” button to add a new app link entry. Create a new URL mapping with the following details:
Host: https://swiftsynq.com
Select “pathPrefix” from dropdown
Path: /login
Activity: com.swiftsynq.simpleloginkotlin.base.SigninActivity(base)
5. Add android:autoVerify=”true”
When a user clicks on your link, you want them to be directly sent to your instant app, without an annoying disambiguation dialog like the one shown below:

To prevent this occurrence, simply add auto verify to your App Link intent filters for http://swiftsynq.com/signin and https://swiftsynq.com/signin. You’ll need to open up the Android Manifest for the :base module and set the attribute android:autoVerify="true" for the intent filter:
Your final manifest will look like this:
<?xml version="1.0" encoding="utf-8"?>
<manifest xmlns:android="http://schemas.android.com/apk/res/android"
    package="com.swiftsynq.simpleloginkotlin.base">
    <!-- To auto-complete the email text field in the login form with the user's emails -->
    <uses-permission android:name="android.permission.GET_ACCOUNTS" />
    <uses-permission android:name="android.permission.READ_PROFILE" />
    <uses-permission android:name="android.permission.INTERNET" />
    <uses-permission android:name="android.permission.READ_CONTACTS" />

    <application
        android:allowBackup="true"
        android:icon="@mipmap/ic_launcher"
        android:label="@string/app_name"
        android:roundIcon="@mipmap/ic_launcher_round"
        android:supportsRtl="true"
        android:theme="@style/AppTheme">
        <activity
            android:name="com.swiftsynq.simpleloginkotlin.base.LoginActivity"
            android:label="@string/app_name">
            <intent-filter>
                <action
                    android:order="1"
                    android:name="android.intent.action.MAIN" />

                <category android:name="android.intent.category.LAUNCHER" />
            </intent-filter>

            <meta-data
                android:name="default-url"
                android:value="http://swiftsynq.com/home/solutions/mobile-apps" />

            <intent-filter>
                <action android:name="android.intent.action.VIEW" />

                <category android:name="android.intent.category.DEFAULT" />
                <category android:name="android.intent.category.BROWSABLE" />

                <data
                    android:scheme="http"
                    android:host="swiftsynq.com"
                    android:path="/home" />
            </intent-filter>
            <intent-filter>
                <action android:name="android.intent.action.VIEW" />

                <category android:name="android.intent.category.DEFAULT" />
                <category android:name="android.intent.category.BROWSABLE" />

                <data
                    android:scheme="https"
                    android:host="swiftsynq.com"
                    android:path="/home" />
            </intent-filter>
        </activity>
    </application>

</manifest>
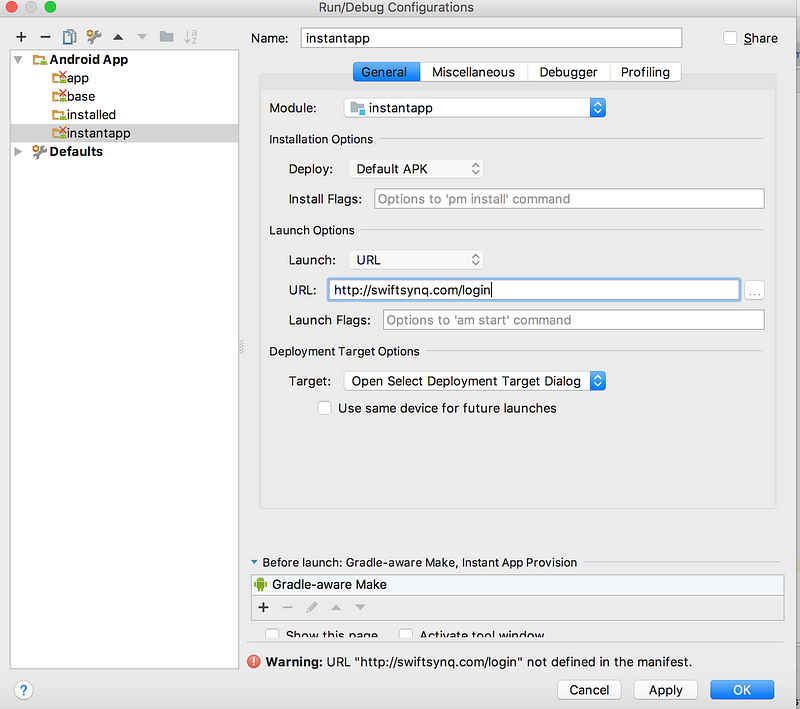
To run your creation, you’ll need to setup a run configuration that says which URL to open.
Click the Run configuration dropdown and choose “Edit Configurations…”
Select instant under Android App.
Replace the text ‘<< ERROR — NO URL SET>>’ with https://swiftsynq.com/login
Congratulations!
You have successfully created and deployed an app with Google Play Instant. You took an existing Android app and restructured it to build both a full installed APK and an Instant APK that will be loaded when the user taps on the associated URLs.
Take a look at the final state of the code here.





No Comment! Be the first one.