


Hello World!!! I am excited to share the second half of my article. I trust that my previous article gave you an insight to the core part of Apigee. If you haven’t read this article, don’t worry you can click on this link to read my part 1.
To get started with creating your simple API with Apigee. I’d like to explain some key concepts on Apigee platform, this will provide you with adequate information required to build an API system effortlessly.
1. API product
An API product bundles resources (such as API proxies) in order to provide a specific level of access and functionality for client app developers. An API product typically specifies a list of API proxies, along with access limits, API key approval method, and other configuration that should be in place for all of the bundled proxies.
For instance, you can:
- Bundle resources accesssible only by internal developers — or only by paying customers.
- Mix and match a set of API proxies to create a specialized feature set for each API product.
- Keep access to bundled proxies low (such as 1000 requests per day), then offer access at a bargain price.
- Allow access to the same proxies at a higher levels for a higher price.
- Offer read-only access to certain resources via proxies in one API product, then sell read/write access to the same resources via another API product.
2. API keys
When you sign up a developer’s app in your organization, it’s important to note that the app must be associated with at least one API product. Sequel to pairing an app with one or more API products, Edge automatically assigns the app a unique consumer key. Whenever the app makes a request to an API resource in your API product, the request must include its unique API key.
API key enforcement doesn’t happen automatically. You must enforce API key checking in your API proxies with a policy, such as the Verify API Key policy. Without some type of key enforcement policy, anyone can make calls to your APIs. For more information, see Verify API Key policy.

Bottom line, Edge automatically generates keys, but you have to enforce key checking in your APIs.
By default, all key requests to an API product from an app are automatically approved. You can instead choose to approve keys manually. If you set this option in the Edge management UI when creating the product, you will have to approve key requests that come in from any app that adds the API product.
3. Quotas
Quotas can secure your backend servers for extremely high traffic, and differentiate your product line. For instance, you might want to bundle resources with a high quota as a premium product and use the same bundle with a lower quota as a basic product. A quota can help protect your servers from being overwhelmed if a product is particularly popular.
Do you get me? Great let’s move on…
4. Scope
As an added level of security, you can define any OAuth scopes, as a comma-separated list, that must be present in access tokens sent through the product. When you’re creating a product, you need to be aware of all the scopes your organization uses. The scopes you add to a product must match existing scopes or the product is not secure.
Yessssss!!!!! We can now move to the main course

Hey!!Take your eyes off that chicken…Main course here means creating Apigee API and not eating free chicken…:)
Now lets create our API
Creating an API product
To setup a basic API, we need to start with creating an API product first.
- Login to the Edge management UI at https://enterprise.apigee.com. (You can obtain a free account at https://login.apigee.com/sign_up.)

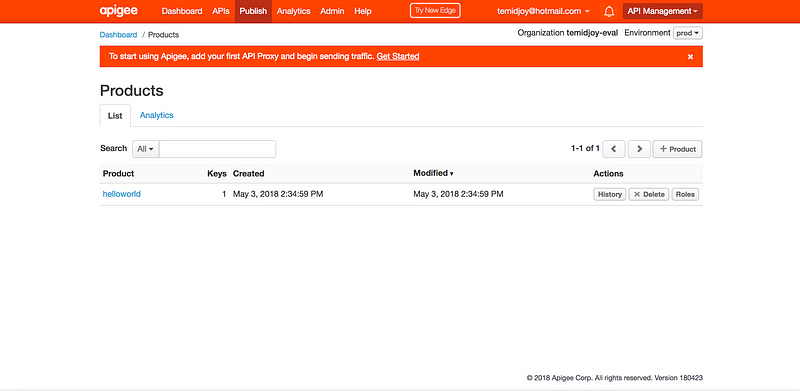
- Click the Publish tab, then Products.

- Click the (+) Product button.
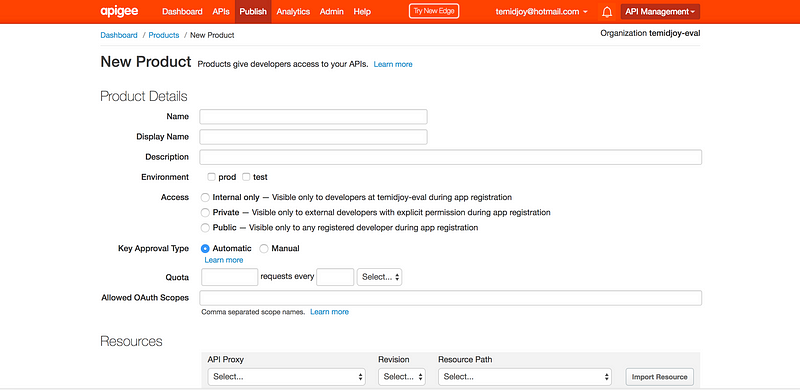
- On the Add Products page, enter your preferred Name. This will be the internal name of the product. You cannot however edit the name once the product is setup. Note that you cannot use special characters in the name.
- Enter a Display Name. The display name displays in the UI. The Display Name field is automatically populated using the contents of the Name field, but you can edit it. You can change the display name at any time by editing the product. You can use special characters in the display name.
- Optionally, enter a Description for the API product.
- Please add at least one API proxy to the product. If you have an existing API proxies you have created, click +API Proxy to select from your list of Proxies. This limits access to the API proxies listed. You’ll be able to configure resources later in this procedure.
- Environment: Select the environments the product will allow access to. For example, select the test environment for internal-facing products or the prod environment for public-facing products.
- Specify an Access level.
- Public — When developers create or modify their developer apps in a Developer Services Portal, they can see and select public products.
- Internal only or Private — There is no functional difference between these two options. When an API product is internal only or private, the product doesn’t appear in the Developer Services Portal. To let a developer use the product, you must manually add the product to a developer app in the management UI or with the management API. Once you do this, the developer sees the product associated with her app in the Developer Services Portal.
- Select a Key Approval Type as Automatic or Manual.
If you select automatic key approval, all key requests that come in from any app that uses this API product are automatically approved. If you select manual key approval, you will have to approve key requests that come in from any app that uses this API product. - Entering a quota Quota limit does not automatically enforce restrictions on the number of calls that can be made through the product. Enter a quota limit that you want to reference from quota policies.
- Optionally, if you are using OAuth with the API product, enter the Allowed OAuth Scopes that you want the product to allow (such as ‘Read’ or any other scopes that apps will send with their API calls). You can specify multiple scopes as a comma-separated list.
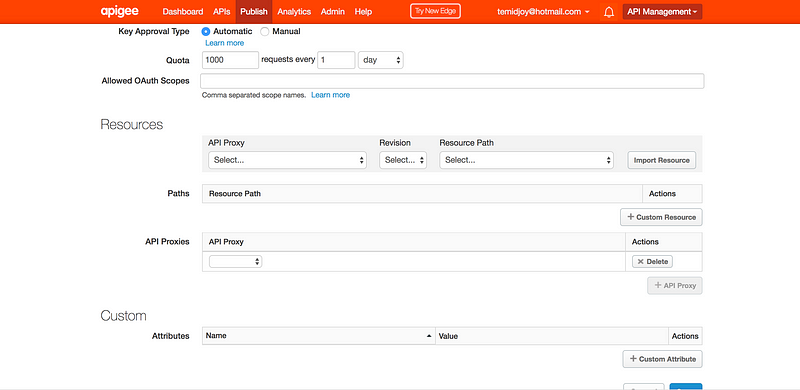
- In the Resources section, add an API Proxy, Revision, and Resource Path to the API product. Including Resource Paths lets you further restrict API access with relation to the API proxies included in the product. For instance, let’s say you add a “patients” API proxy to the product with a base path of /patients. That means the product allows calls to /patients. However, you want the product to allow access to only the country resource, which has a URI of /patients/country. By adding a /country Resource Path to the product, the product allows calls to only that URI. For example, calls to
/patients/country?name=Nigeriago through, but calls to/patients/diagnosis?type=top%levelget rejected. You can add Resource Paths either by selecting one from an existing API proxy API Proxy, Revision, and a Resource Path (then click Import Resource), or by clicking +Custom Resource and adding a free-form resource pattern. - (Optional) You can also add up to 18 custom attributes to an API product. Custom attributes are key/value pairs that can be used in many ways, including helping control API proxy execution. For example, you could create a custom attribute called
deprecatedwith a value of true or false. In your API proxy flow, you could check the value of the API product’sdeprecatedattribute (for example, using theverifyapikey.{policy_name}.apiproduct.deprecatedvariable that is automatically available after you create the custom attribute). If its value is true (deprecated), you can throw an error with the Raise Fault policy. - Save your product.
Congratulations!!!You just created your first API product
If you are having issues with using Apigee platform kindly drop a response on the comment box of this article, I will definitely provide you with help.
In my next article, I will be sharing the stepwise approach to creating a portal for your API, this portal allows other developers to access a proper documentation for your API. Do you need to write code to achieve this?
NO!!
Enjoy!!!


No Comment! Be the first one.